MVVM and FRP: Architectures for Mobile Apps Part 2
The posts in this series are long, but I promise they are worth it!
The Match Game
The source code is hosted on GitHub in this repository: https://github.com/field-theory-org/match-game-architecture.git.
The structure of the repository is as follows:
├── 01_Common
│   ├── MatchModel
│   ├── MatchView
│   └── Resources
├── 10_Commandline-App
├── 20_Basic-App
├── 30_MVVM-App
├── 40_MVVM_FRP-App
In the first part, I have explored three different approaches to writing the match game:
- As a CLI app running on the macOS command line (in the folder
10_Commandline-App), - as an iOS app using the MVC pattern with a single large controller
for each screen (in the folder
20_Basic-App), and - as an iOS app using the MVVM paradigm with view models on all
screens (in the folder
30_MVVM-App).
While the MVC-based app lacked unit-testability, leading to extensive UI tests for comprehensive functionality coverage, the MVVM app enabled unit testing at the view model level. However, this came at the expense of increased complexity, particularly in terms of communication between the view model and the controller.
In this post, I demonstrate how Functional Reactive Programming (FRP) can be employed to effectively reduce this complexity.
The code accompanying this article can be found in the folder
40_MVVM_FRP-App.
Functional vs Imperative Programming
Functional programming sounds as the latest hype, but it has been around longer than object-oriented programming and shares a similar history with imperative programming.
At the core of functional programming is the concept of a “pure functions”, which transform input to output without altering state. In contrast, object-oriented programming relies heavily on state.
While most real-world problems need state, functional programming seeks to minimize state dependency, leading to several advantages:
- Reduced handling of “shared state” reduces the potential for bugs.
- Explicit dependencies enhance code readability and simplify verification.
- Parallelization of code and concurrent data model updates become easier.
The extension of functional programming to UI events has been pioneered in the paper Functional Reactive Animation. A great introduction to the concept for contemporary UI development is in this gist.
The following example taken from the aforementioned gist illustrates how a stream of click events can be used to identify all double- and triple clicks with just a few lines of pseudo-code:
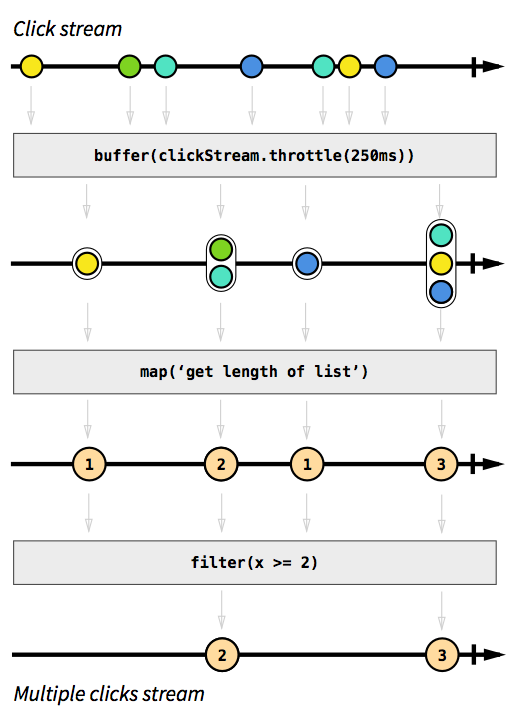
While it’s possible to replicate this with state-based imperative code, are you confident in doing so in just four comprehensible lines without introducing bugs due to obscure special cases? That’s the best part of functional programming: We don’t have to!
Managing Events in iOS Apps
When discussing traditional UIKit-based iOS apps, there are numerous paradigms for communicating between components, allowing 1-to-1, 1-to-many, many-to-1, many-to-many, you name it. Here is a list of common patterns:
- Delegates,
- data sources,
- target-action,
- KVO,
- Notification Centers,
- Listeners,
- URL-responders,
- using third-party libraries you get futures and promises, too.
Functionally Reactive Programming (FRP) libraries, on the other hand, offer:
- A unified concept for events (download completed, file loaded, computation done, user interaction, etc.).
- A functional/declarative API in the form “X -> Y”.
- Plays naturally with the MVVM pattern.
Here is an example:
- Imperative
- The object-oriented match game app relied on several
updateStatecalls which needed to be placed whenever an operation might have modified a state that might impact something else. As an example, theupdateStatemethod would read all other states that might influence theenabledstate of a button and adjust it accordingly. - Functional
- Instead of handling the state directly, we rather declare that the
button’s enabled state shall depend on conditions X and Y. Although
these conditions may again be state-dependent, the need to explicitly
invoke
updateStateis eliminated, along with potential bugs caused by overlooking this requirement. Furthermore, intermediate states and invocations used solely for bookkeeping purposes may be removed.
Ultimately, this approach simplifies the code.
The MVVM-FRP Match Game App
For this example, I have added the 40_MVVM_FRP-App folder. For
implementing FRP I have decided to use the
ReactiveSwift and
ReactiveCocoa
frameworks. Another project that has generated traction recently is
RxSwift. Apple has also
introduced its own product,
Combine. The
latter plays best with SwiftUI which introduces the concept of
declarative UIs and thus goes beyond merely functional programming. I
will focus on that approach in a later post.
Different FRP frameworks may use slightly different terminologies and APIs, but their underlying concepts remain similar. Consequently, don’t be overly concerned with the specific syntax presented here. Once you have a solid grasp of the fundamentals, transitioning to a new framework becomes easy.
Handling UI Updates
To effectively utilize FRP with standard iOS controls, a wrapper is needed to convert control events into event sources for the FRP framework. Conversely, events from the FRP framework must be transformed into UI updates.
This is facilitated by the RAC.swift collection of extensions. I
have updated the code originally by
Colin Eberhardt,
and updated it to work with modern Swift and expanded it to cover the
use cases in the match game app.
For example, the text of a UILabel is updated by events as follows:
| |
Where the labelText property of the viewModel is a ReactiveSwift
MutableProperty that encapsulates an event of string value.
Employing data binding in this manner offers several advantages:
- The state is updated automatically whenever a value-update event is triggered.
- A single state is accessed by multiple consumers who are aware of the state they observe. Consequently, the state is unaware of how many consumers there are. Imperative programming inverts this dependency, often complicating matters.
- The functional approach is inherently and naturally asynchronous.
Managing the Number of Matches
In the actual implementation, a wrapper is needed for turning the
“classic” communication pattern of the data model into a functional
pattern. This is what the ReactiveModel class is for. It turns any
data model changes into a “property” that serves as an “event source”
which emits events of type Int:
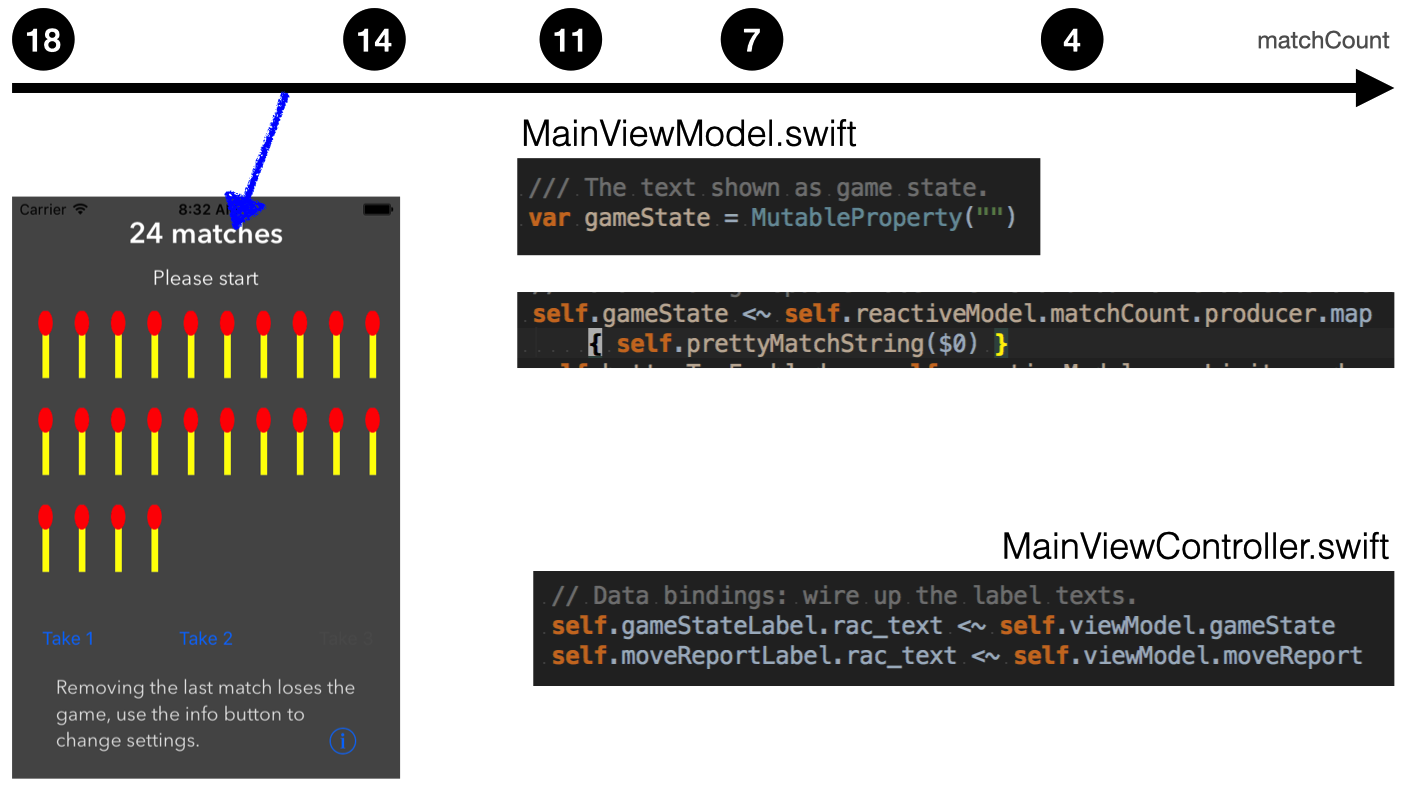
| |
The number 18 represents the initial value of the event source. As
the number of matches changes throughout the game, the event source
will emit new events with the current value.
These events are consumed by the view model and translated into
different events, which are subsequently employed in the view. The
view model code in MainViewModel looks like this:
| |
This line means “whenever the matchCount changes, change the
gameState by turning the number of matches into a string that shall
be shown in the UI”.
The corresponding code in the view controller MainViewController is:
| |
In either case, setting up the connection between the “source” of
events and the “consumer” of events happens in the initialization
method of either class – specifically, in viewDidLoad of the
MainViewController and in init of the MainViewModel. This makes
it very easy to find dependencies or extend them when needed.
So far, I have still used the “classic” patterns in ReactiveModel to
connect the non-reactive data model. However, if the intention to use
FRP was clear from the beginning, the data model could have been
written differently to avoid using other patterns.
Handling the Button States
The “Take 2” and “Take 3” buttons must be disabled whenever there are
insufficient matches left or when the maximum number of matches that
can be removed is too low. This is handled in an imperatively in
MatchPile::limit which is called by MatchModel::userLimit. Only
when it is used in the MainViewModel, it is translated to the FRP
pattern in this line:
| |
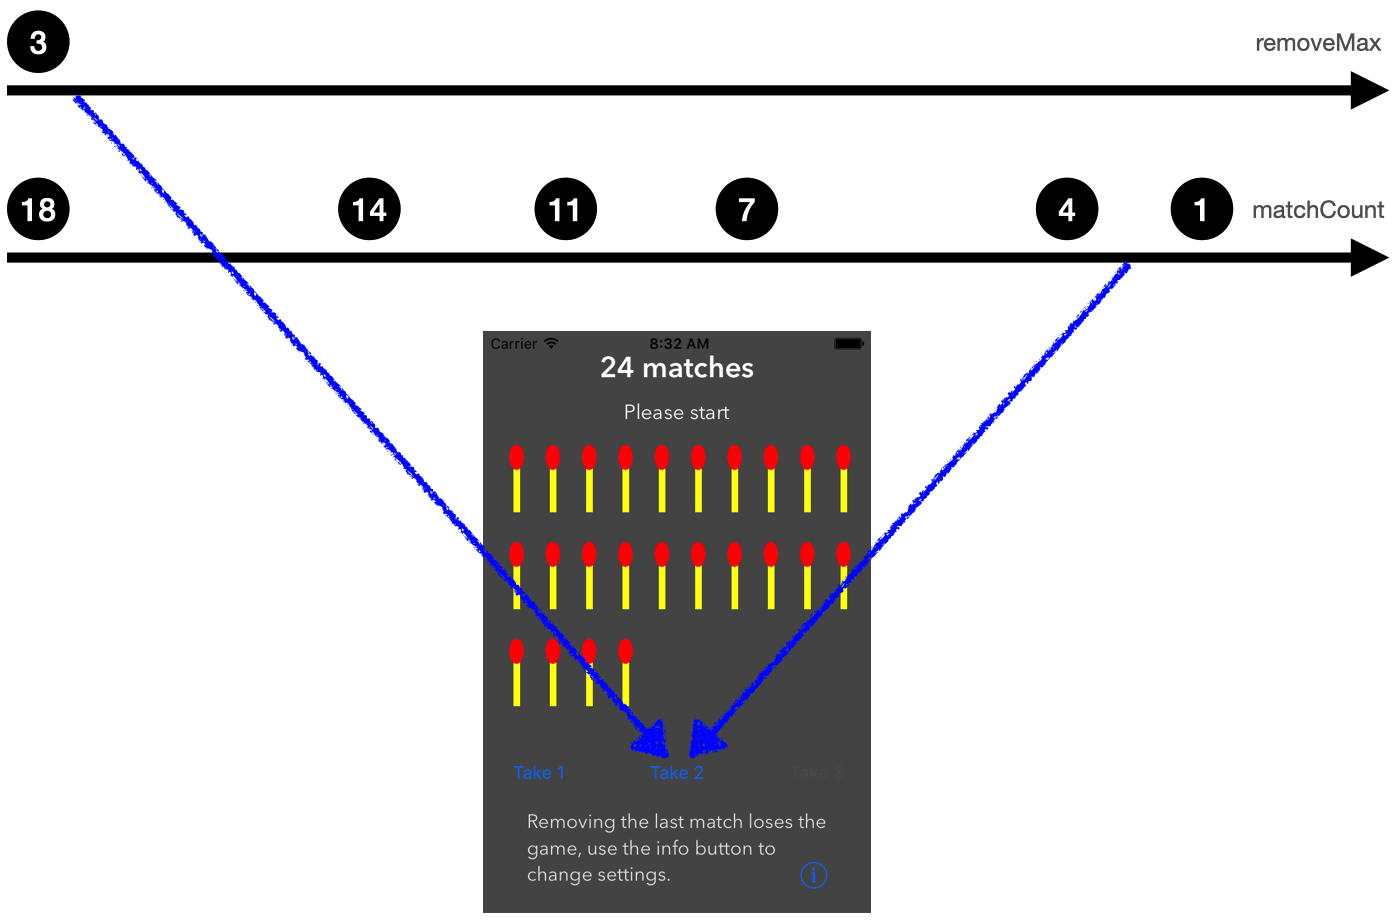
Alternatively, this could be rewritten entirely using functional programming. To do that, I replace the above line with the following block:
| |
This block of code consumes the two signals for matchCount and for
removeMax, which both emit integer values. It then maps each of
these signals to the inline function shouldEnableTakeTwo. The result
comprises two signals of boolean values,
matchCountShouldEnableSignal and removeMaxShouldEnableSignal.
These are combined using the combine method by applying a logical
&& function to the boolean values. The resulting signal,
mergedSignal, emits boolean values which are then bound to the
enabled state of the “Take 2” button.
At first glance, this approach may appear more complex. However, it has a couple of merits:
- Decision-making occurs at a single point, with dependencies declared in one place.
- Signals can be transformed and combined based on their values.
- The original imperative code was distributed across multiple methods in several classes. It was not shorter, but harder to follow.
The introduction of the MVVM pattern required more code and increased complexity. With FRP, the code may become more concise, and it will certainly be easier to follow.
Adding a Warning Dialog
From the match game player’s perspective, there might be an unfortunate situation where the user selects the “smart engine” and a number of matches that is guaranteed to lose the game. In this situation, I want to display a warning dialog when the user is about to leave the settings screen. If the user is fine with the choice, the settings screen closes and the app returns to the main screen. Otherwise, the user stays on the settings screen.
This scenario highlights how the MVVM pattern enables modifications to the app’s workflow entirely at the view-model level. No change is needed for the controllers!
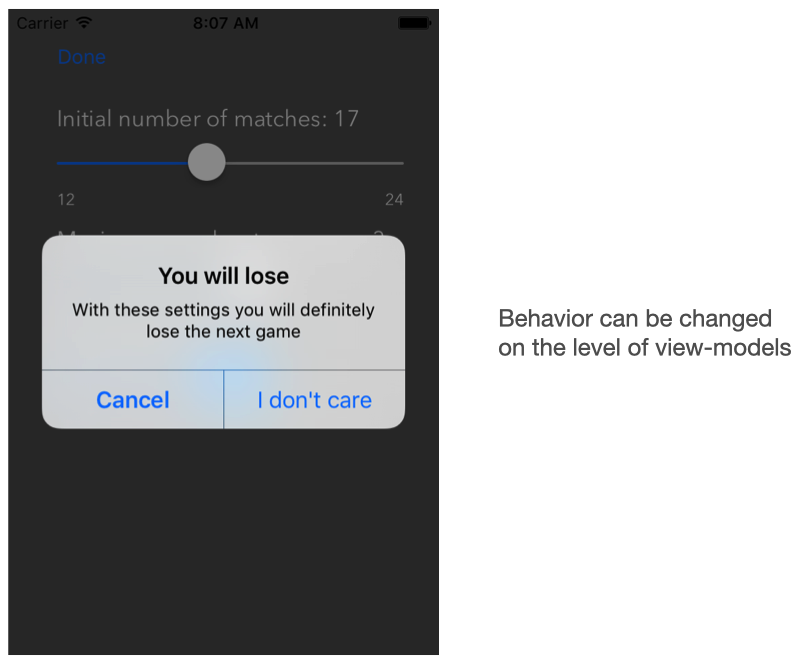
By replacing the SettingsViewModel.swift file with the alternative
version SettingsViewModel.swift.alt, the dialog will be displayed.
The user leaves the settings screen after tapping the “confirm” button
on the dialog; otherwise, she remains on the settings screen.
One practical advantage of this approach is that it often makes it easier to modify business logic and/or design independently. Although this may not always be the case (and it might not always be a good idea even when possible), it still tends to offer increased flexibility.
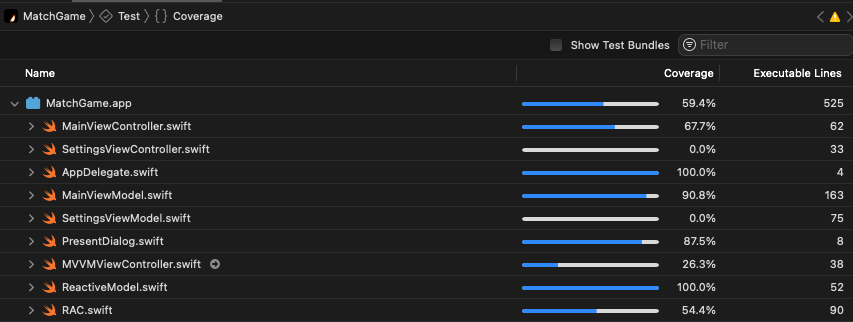
Testing Using the FRP Paradigm
The changes the FRP pattern has introduced mostly unify the communication and data flow between parts of the app. They do not change the fundamentals of the MVVM pattern. Thus, I was not surprised to see that tests can still be written with the same expressiveness and perform as fast as they did in the previous MVVM approach:
Potential Issues With this Approach
From what I have explained so far, FRP works quite naturally with MVVM. However, I have also run into potential challenges that were not obvious from the start:
- Performance may be worse, in particular when it comes to collection views. Although mobile devices are becoming more and more powerful, I have had to optimize tight spots by returning to use delegates instead of events once.
- Particularly with Objective-C, one may end up with memory leaks with the ReactiveCocoa framework. When dealing with an older code base it is important to understand the patterns of the FRP framework in use.
- This shows that FRP introduces new concepts and paradigms that might not be familiar to developers experienced in imperative programming. This means a team might need more time to adjust to the new programming style.
- Debugging is more complex. With a third-party FRP framework, it is not clear how information flows, and I often had to insert debugging logs in the code to understand the flow. This happened more often than with other patterns.
- FRP can make error-handling more complex or less intuitive compared to traditional imperative programming.
It is important to bear in mind that there are hard rules (like “don’t
trigger UIAlertViews from view models”) and soft rules (like “use
declarative rather than imperative workflows”). The former are not
meant to be broken under any circumstances. The latter may be.
Summary
The Functional Reactive Programming (FRP) pattern naturally complements the MVVM pattern. It remains possible to have fast, meaningful tests, while the associated complexities are reduced. However, it is important to be aware of the potential downsides, including performance considerations, and increased debugging and error handling complexity. Some of these issues can be mitigated with Apple’s SwiftUI, which offers more seamless integration with iOS toolchains.
I’ll explore this in a follow-up installment of this series – so stay tuned!