MVVM and FRP: Architectures for Mobile Apps Part I

The posts in this series are long, but I promise they are worth it!
The Match Game
In this post, I walk through different ways of writing an app using different architecture patterns for the UI. Starting from a generic MVC (Model-View-Controller) approach, it moves on to explain how to use MVVM (Model-View-View Model) and the advantages of doing so. This article is the first in a series which explains the basics. The next article will delve into FRP (Functional Reactive Programming).
As an example I use a simple game, the match game. The rules are:
- The game has two players, the human player (the ‘user’) and the computer.
- The game start with a pile of matches (the user picks the initial number, e.g. 12).
- The user picks among three kinds of computer engines: the dumb engine (always takes a single match every time), the wild engine (random moves), and the smart engine (perfect play).
- The players take turns and remove at least one and at most a given number of matches (the user picks that number at the start of the game, e.g. 3).
- The player who takes the last match loses the game.
The source code is hosted on GitHub in this repository: https://github.com/field-theory-org/match-game-architecture.git.
All programs are written in the Swift programming language and run on macOS and iOS. Over time, I have adapted the game to use the latest version of Xcode and library dependencies. This was a bit tedious since neither Apple nor third-party developers showed any hesitation to introduce incompatible changes even during minor releases.
The basic structure of the repository is as follows:
├── 01_Common
│   ├── CustomViews
│   ├── Model
│   └── Resources
├── 10_Commandline-App
├── 20_Basic-App
├── 30_MVVM-App
Each subdirectory contains a different approach to the integration of
the model code and the user interface. This post deals with the
01_Common code, the 10_CommandLine-App, the 20_Basic-App, and
the 30_MVVM_FRP-App. Later articles focus on further
subdirectories. However, all apps share the same basics from
01_Common.
The Common Code
The directory 01_Common contains the code and resources common to
different implementations.
- Model
- The data model in the
Modeldirectory contains the different engines and basic logic of the game which is independent of the way the user interface is implemented. This is really the way it should be – the model should have no dependency on the interaction with the user. - CustomViews
- The
CustomViewsdirectory is needed for iOS and contains views that draw an individual match and with that the match pile itself. This part has no dependency on theModel. Again, this is the way it should be, the interactions with the user shouldn’t depend on the data model. - Resources
- Graphical resources needed for the iOS app like icons.
The Command Line App
As emphasized above the Model should not depend on how the game
works on iOS. As a starting exercise on how to use the infrastructure
and to illustrate that this is actually true I have written a command
line app that works on macOS. This can be found in the
10_CommandLine-App directory. Open MatchGame/Matchgame.xcodeproj
in Xcode and we have the following structure:
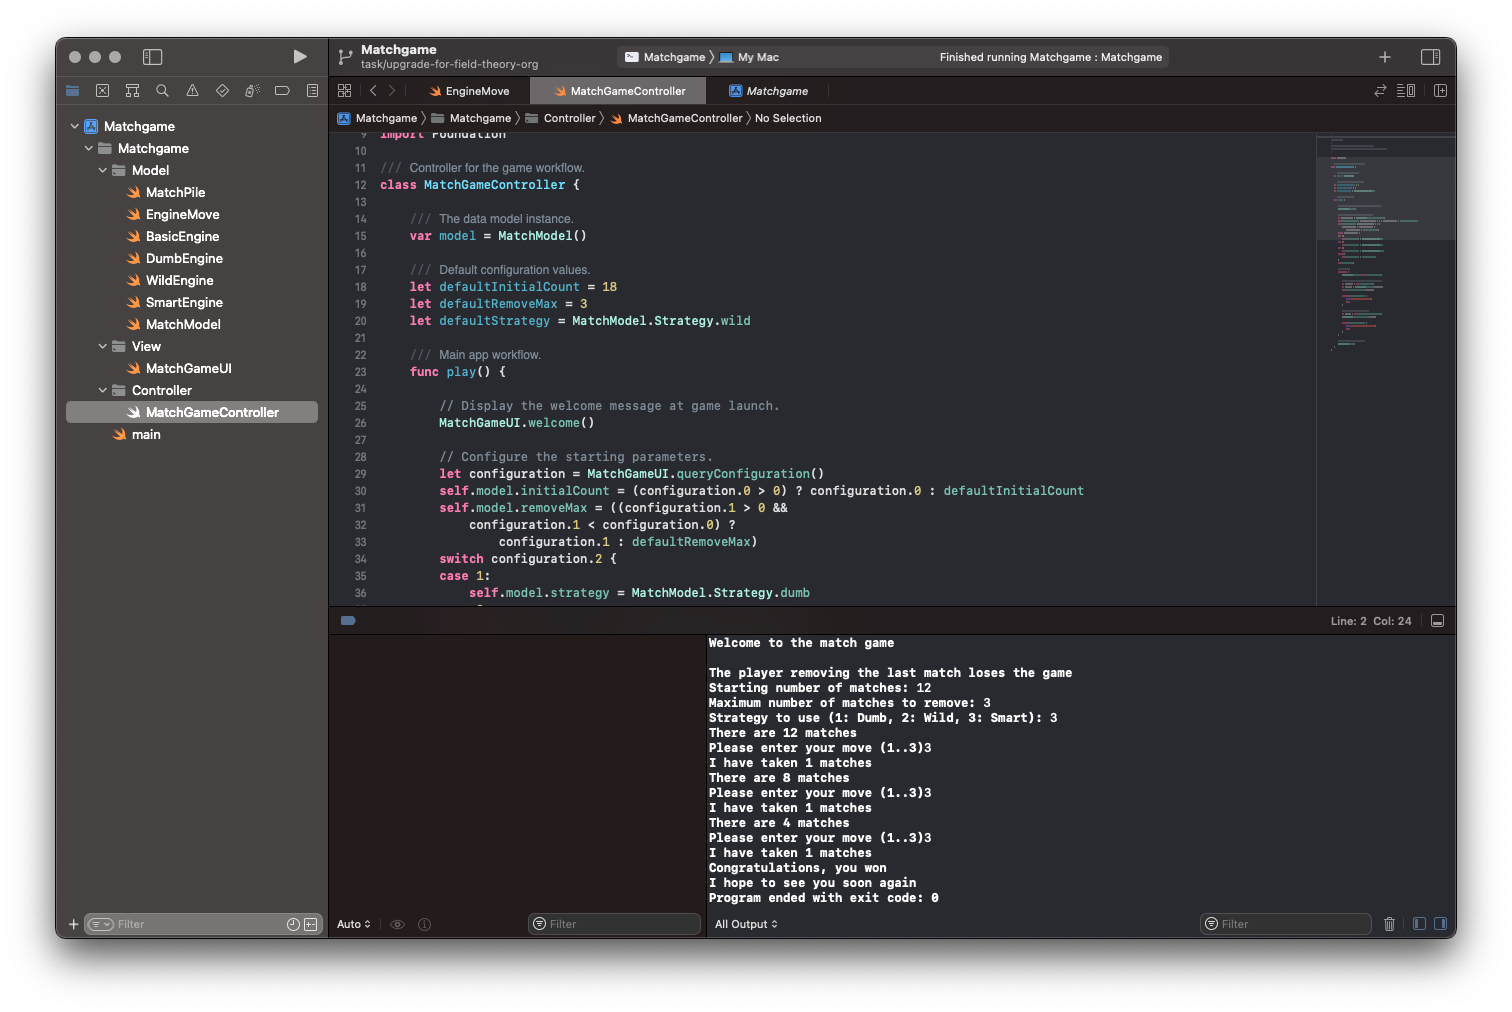
Even though this is a command line app, it still follows the MVC (Model-View-Controller) pattern:
- Model
- The basic data model with all engines. Nothing new or surprising here.
- View
- Yes, even the command line is a User Interface and as such I
have put all user interactions into a dedicated class
MatchGameUI. This class contains static methods that print text on the screen and query user input. It doesn’t depend on theModelat all. Obviously, this is the way it should be. - Controller
- The workflow of the game is handled by a controller class named
MatchGameController. This controller manages the lifecycle of the data model and the flow of the game. It depends on all data model classes and on the view model class. It knows about all the details of either of those classes and passes the appropriate input and output from each method invocation to the correct interface of other classes.
The key in this example is the complexity of the controller class:
- It manages the lifecycle of the
MatchModelclass and contains it as a state variable. There is nothing wrong with this dependency, it has to sit somewhere and the controller is a natural place. - The workflow is linear and sits in the
playfunction. One could argue that it makes sense to split this function into several sub-functions to improve the structure. In general, I agree with that proposition. In this specific case, I don’t favor enforcing too much structure if it does not add any benefit.
Could we already start with this class and introduce an MVVM pattern? The answer is “Yes, we could”! However, in this case, I believe it would introduce complexity without giving us enough benefit in return. As I’ll argue below the MVVM pattern is more complex and offers the benefit of testability in return. The controller in its current form is not testable. Rewriting it in a testable form, however, would make it much longer since we’d have to write significantly more code. That introduces more potential for bugs.
So we are faced with balancing two contradicting goals: On the one hand, we increase the code quality by making it testable. This makes it more robust and easier to adapt in the future. On the other hand, we are introducing more complexity which makes the code more fragile and harder to change.
There is no perfect answer to this conundrum. In this particular case of an example for my blog I chose not to offer any refactoring here and rather do this for the iOS app below. In a business context where millions of dollars rest on the reliability of a “simple” app this the choice may very well look different.
The iOS App
The second implementation of the match game is an iOS app. Open
20_Basic-App/MatchGame/Matchgame.xcodeproj in Xcode. The app has
two screens, a main screen with the game user interface and a
“Settings” screen:
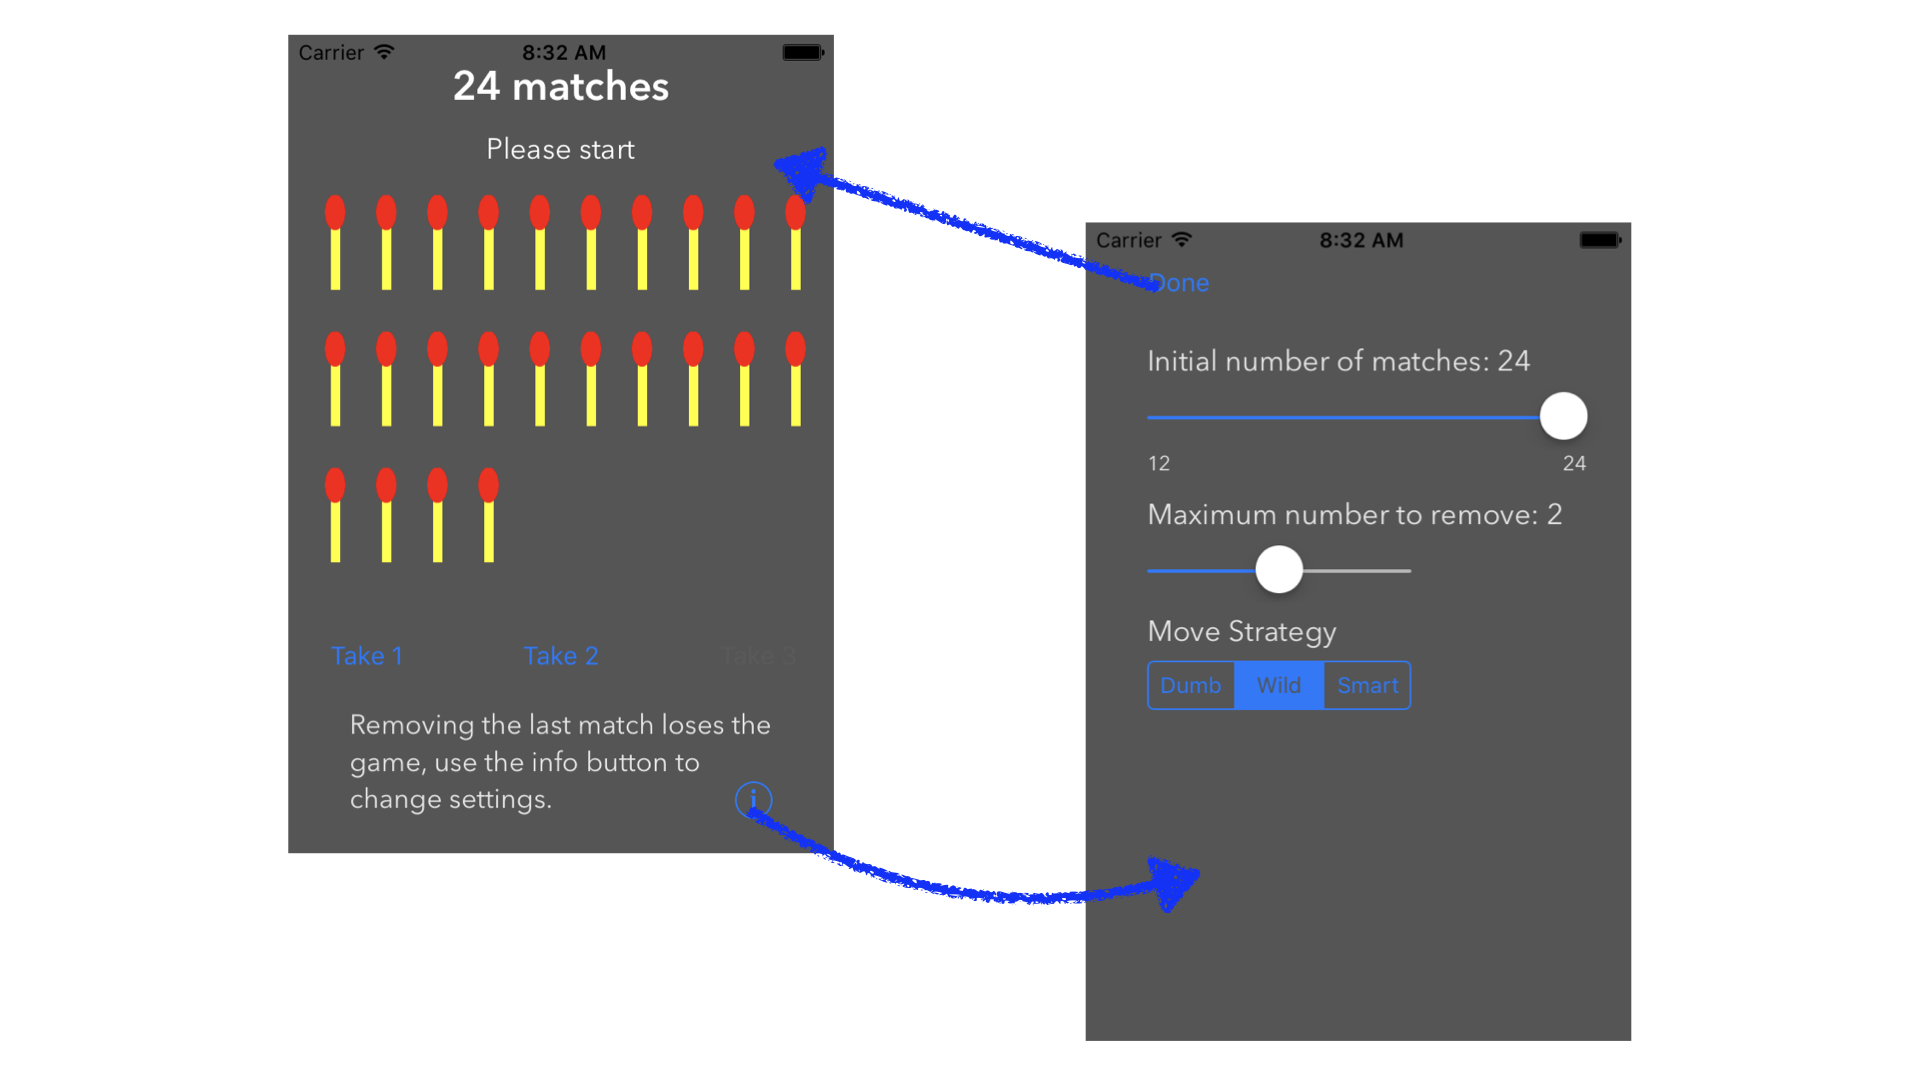
The major difference to the command-line app is that the flow is no longer linear. The user can deviate from the flow of a regular game, e.g., by switching to the “Settings” screen at any time. From the app’s point of view, the controller is no longer in control of the flow (in a loop with “if-this-then-that” behaviors), but it needs to react to both the data model and user interaction asynchronously. This is modeled in an event-type manner, i.e., the model may “do something” and the user may “do something” at any time, and the controller makes sure that the app remains in a consistent state.
There are some additional considerations:
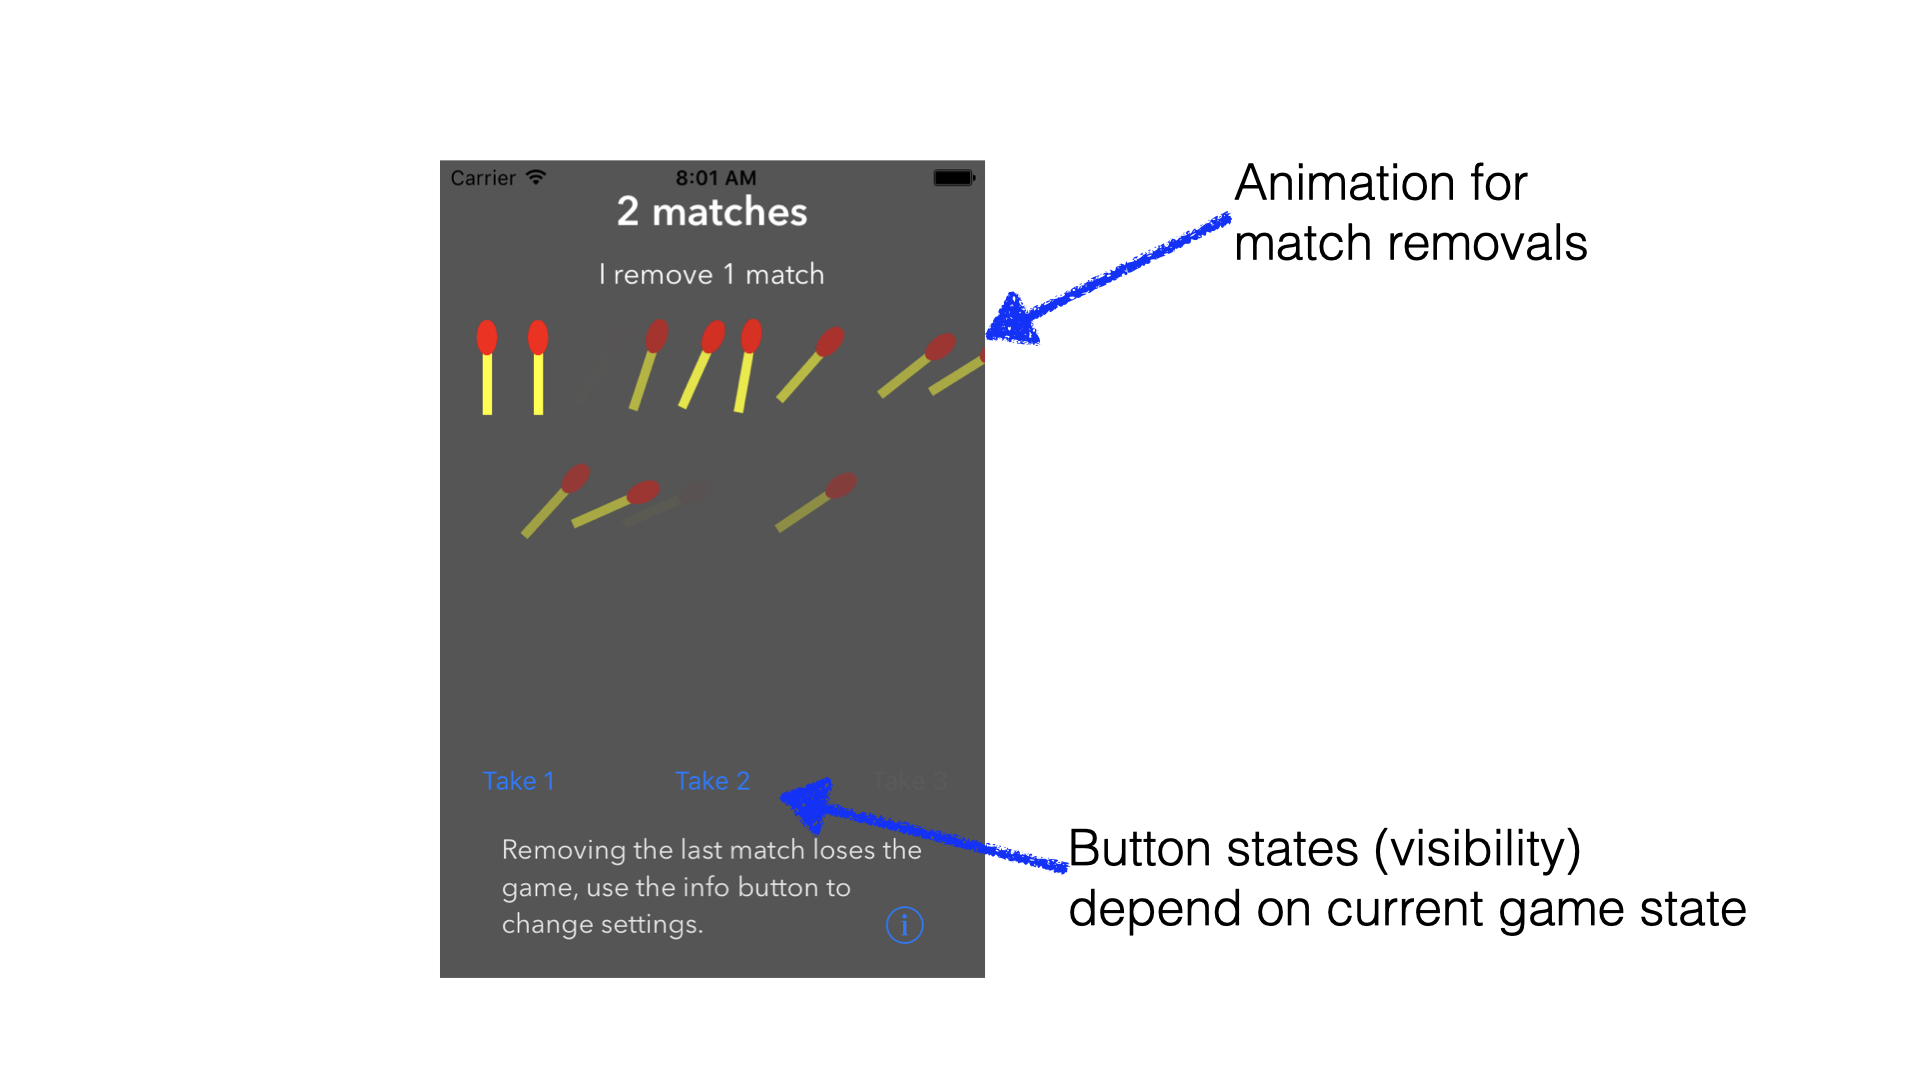
- The UI adapts according to the current game state, i.e. the third button (for removing three matches) disappears if there are only two matches left.
- The UI includes an animation, i.e., it basically updates asynchronously.
- At the end of the game, there is a dialog that informs the user whether she has lost or won the game.
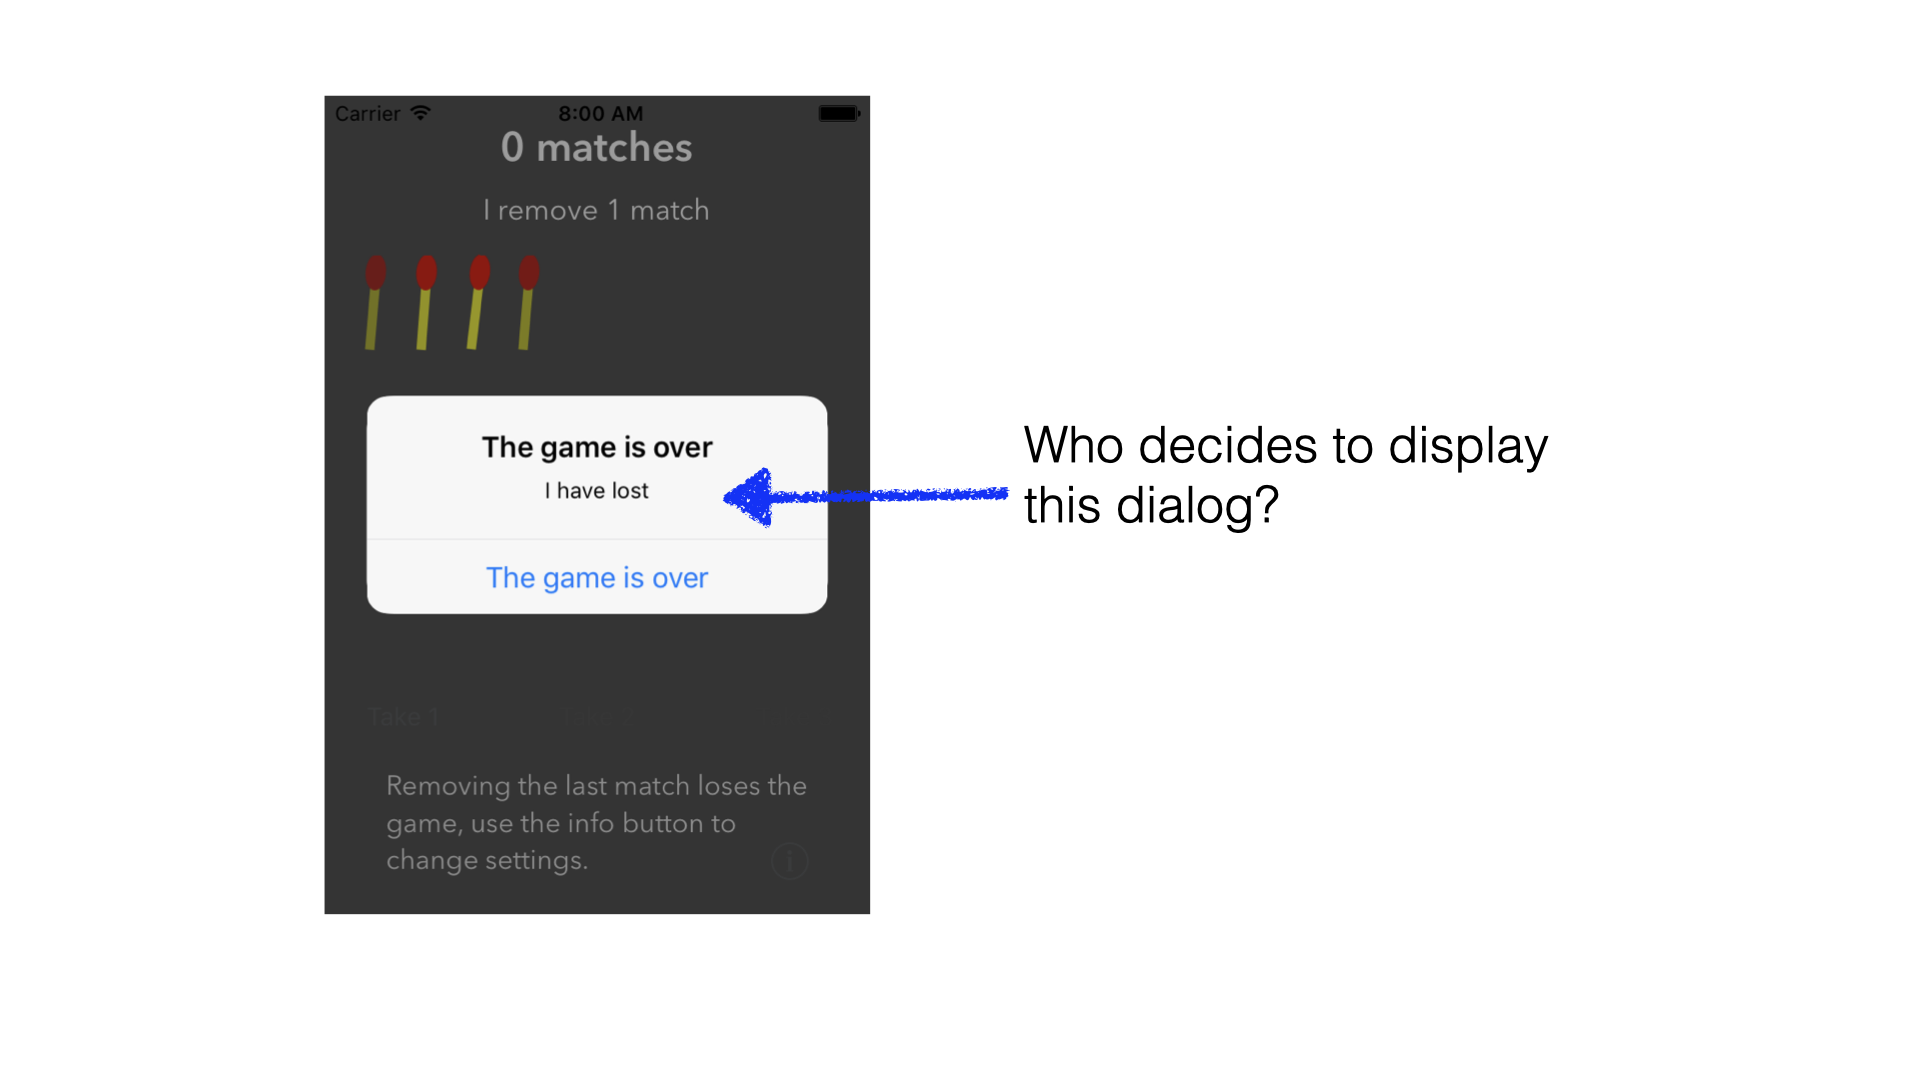
It needs to be clarified how the UI state is handled and who displays the dialog at the end of the game.
Structure of the iOS App
The storyboard of the iOS app is straightforward and contains the two main screens:
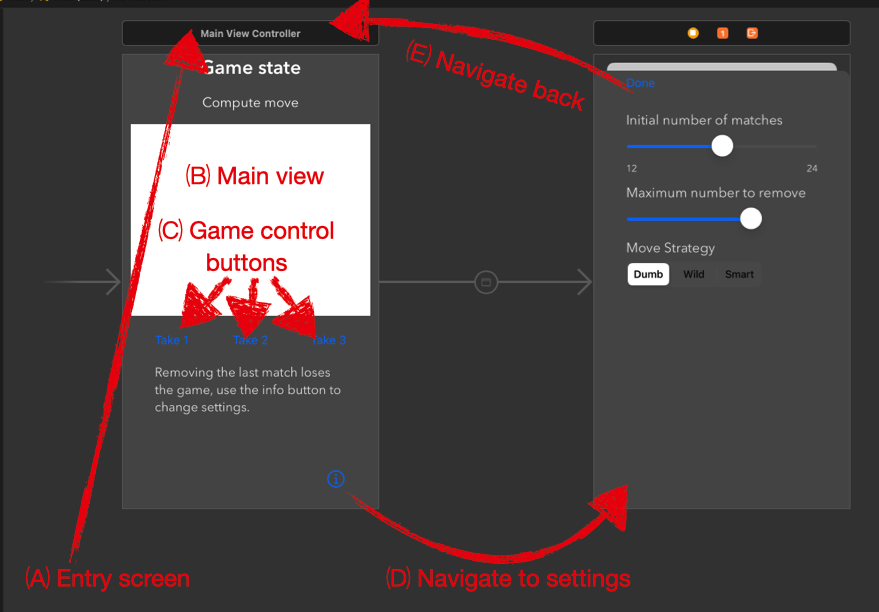
The app starts with the main screen “(A)” handled by the “Main View Controller.” The game starts with certain defaults, and the current situation is displayed in the main view “(B)”. The user can interact with three buttons “(C)”. The user can also switch to the “Settings” screen by tapping “(D)”. The settings screen configures the game, and the user returns using the “Done” button “(E)”.
In this simple app, the controller need not react to the model asynchronously since the model doesn’t perform any long-running background tasks. The computation of moves happens synchronously and “blocks” the app. Since that computation takes a few milliseconds, it is not a problem. For longer-running operations, this won’t work, but in this simple case, it is sufficient.
With the MVC approach, there are two controller classes:
MainViewController- This class is the largest in the project, featuring 200 lines of code. It handles all elements on the game screen, and in addition it also handles the data flow from the “Settings” screen. Communication uses the delegate pattern, which makes the entire class rather complex. It is also responsible for displaying the dialog at the end of the game and for managing the entire UI state.
SettingsViewController- Even though the “Settings” screen has multiple UI elements, it
remains rather simple. It just stores the settings and sends all data
back to the
MainViewController.
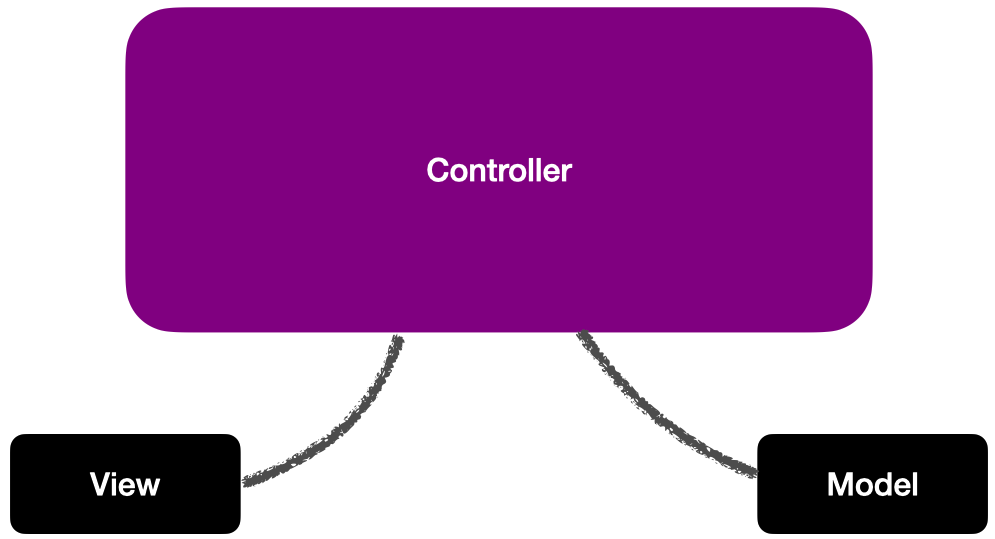
In the MVC approach, the controller code becomes the most complex part, with all logic related to behavior and life cycle handled in large classes. This is depicted in the above figure. There are a couple of problems with this approach:
- Testing (in particular, automated tests) become more challenging, see below.
- We need lots of calls to methods for UI state updates. In the app,
they are called
updateGameStateLabelandupdateButtons. If we miss a call anywhere, the app UI becomes inconsistent, and we have a bug. - All in all, the flexibility to change the UI is limited, as dependencies among different parts of the app become less transparent.
- This means it gets harder to collaborate with designers/front-end developers who change and update the UI in parallel with other developers working on the business logic.
- Separation of concerns becomes an issue, it is tempting to cut corners. That may easily build up technical debt.
- The controller simply does too much, it may turn into the “God-class” antipattern if we are not very careful.
These disadvantages can be avoided, but there is no general architecture pattern that assists developers in doing that. So especially in larger teams, technical debt may build up over time.
Testing the iOS App
There is one big issue with testing:
That means one of our primary tools for QA cannot be applied here.
- Inside the class, the method
updateButtons()is used to turn buttons on or off. This is called at various points insideMainViewController. Every time the state changes, the buttons must be updated. - If we modify the controller, we might miss a call to
updateButtons(). Or we may accidentally delete one invocation, and the app becomes unplayable. - Since the controller instantiates the entire view hierarchy and manages visibility and life-cycle, we can not test it in a unit test. Which means we can only test the data model, and that one is not sufficiently powerful to tell us whether the app is working correctly or not.
Now, the controller code CAN be tested in a UI test. To illustrate our options, I have written two test suites:
MatchGameTests- This is a collection of unit tests. Without the UI, only the data model can be tested. Neither workflows nor controller code can be tested this way.
MatchGameUITests- This is a single test case, playing an entire game and verifying the behavior of the app. The test launches the entire app on the simulator and interacts with the UI.
Let’s look closer at the UI test in MatchGameUITests.
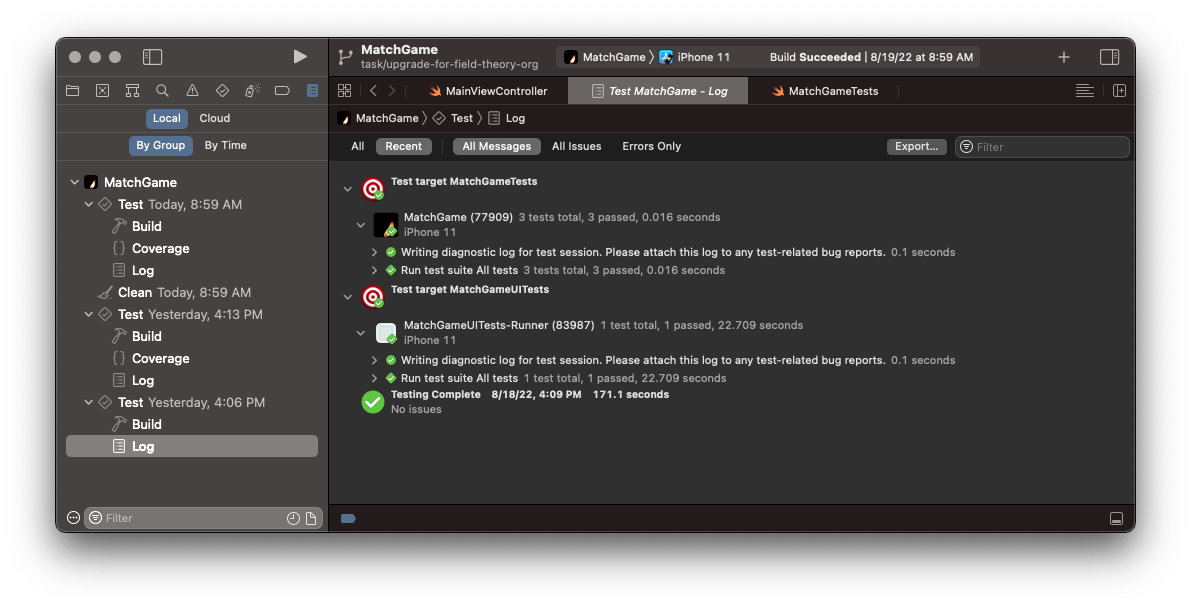
- It tests both the controller code and the UI code.
- The basic workflow is tested. If a change in the app code breaks the workflow, the test will notice it. This is a major benefit!
- The test takes quite some time. According to the screenshot above, it runs for 23 seconds!
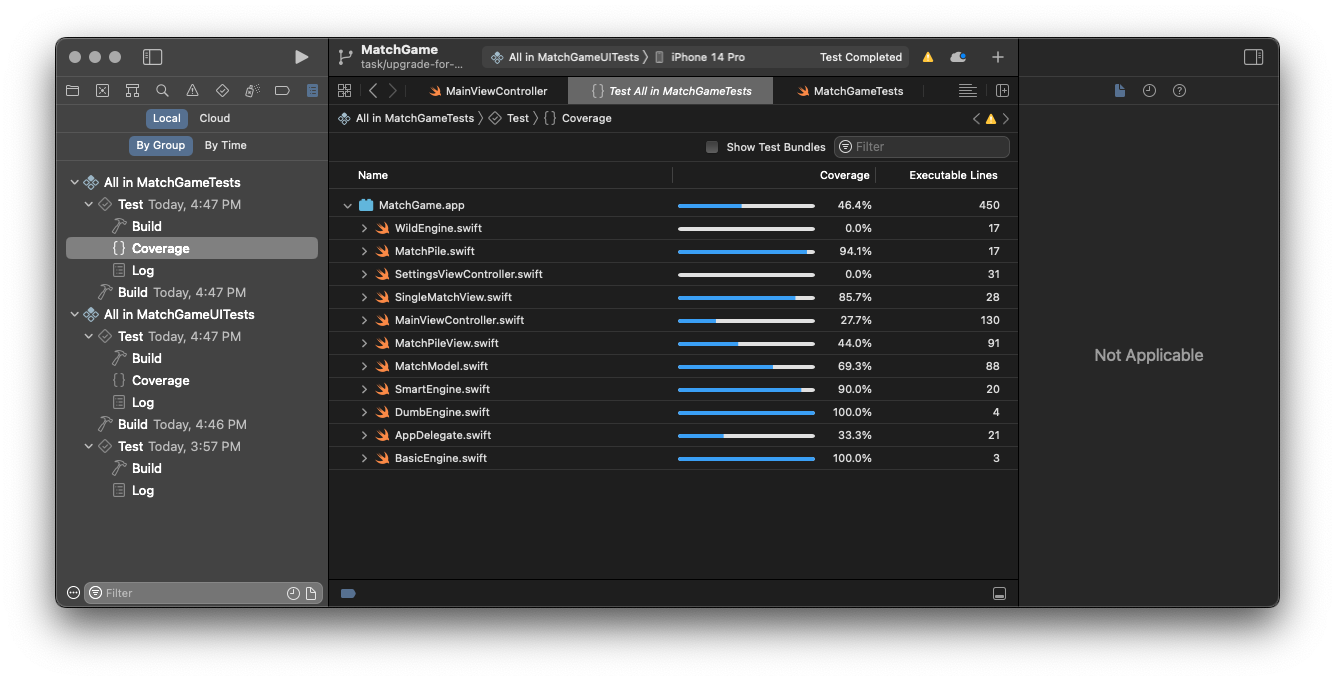
The code coverage is decent, but not outstanding. The main view controller has a coverage of 27% of all lines of code only. The entire code related to the settings screen (and picking up the data on the way back) is not run at all.
The UI test is beneficial, no doubt. On the other hand, the cost is huge:
- Only a single part of the model is covered. If we wanted to cover more, we’d need to write and run more tests.
- If we wanted to test all three game engines (dumb, wild, smart) we’d need to run at least three entire games, increasing the total run-time to more than one minute!
- If all functionality was covered, run-time would be even greater.
- UI tests can be fragile. Minor delays result in a small probability of failure.
- Even minor fragility accumulates, resulting in high failure rates when aiming for higher coverage.
The iOS App with MVVM Pattern
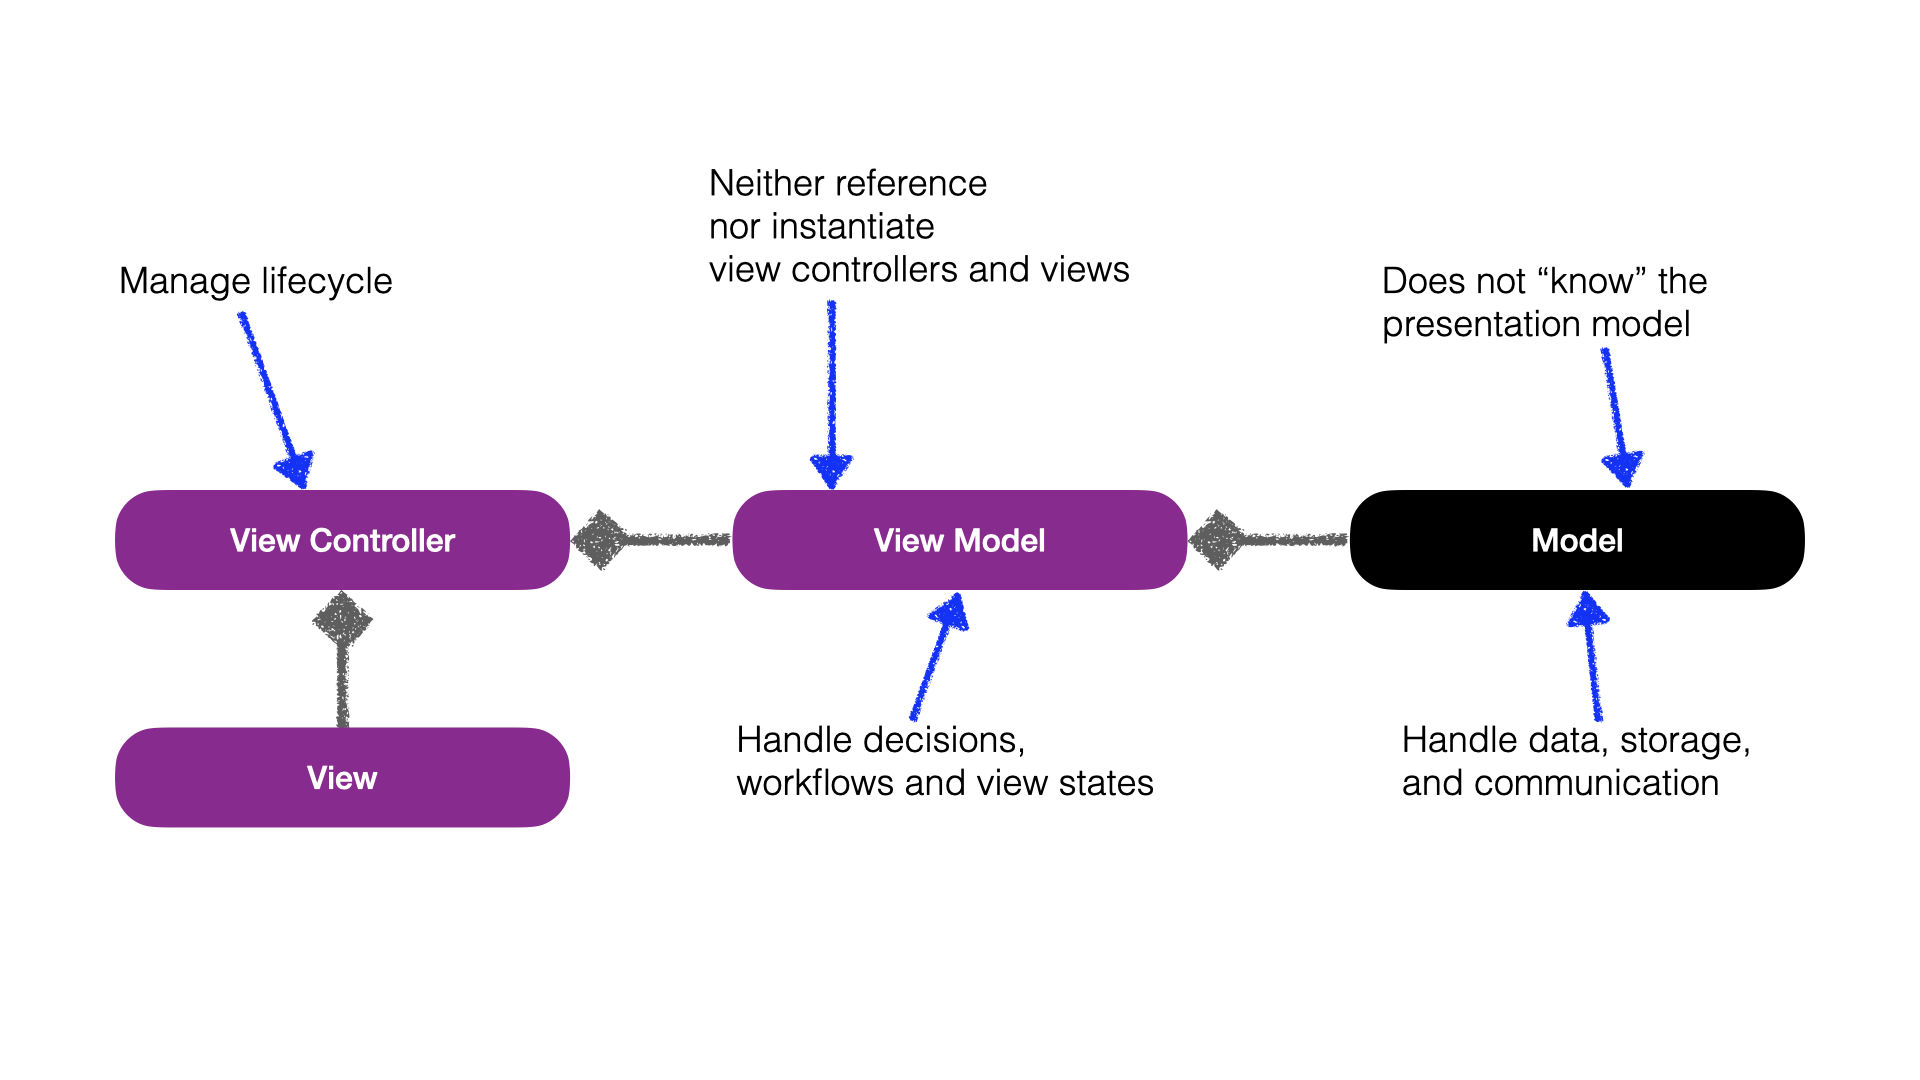
In the MVC-based iOS app, the controller ended up being the most complex class. It was also the hardest to test. The MVVM pattern splits up the controller code into two parts:
- Behaviors and business logic
- The workflow is handled in a class that is decoupled from the view code. Instead, it is put in a separate class, called the “View Model.” This class contains the state of the UI, but does not have any knowledge of the UI implementation. In this way, it is a data model.
- Lifecycle management
- The controller instantiates all views and all view models and keeps them in sync. It does not make decisions on its own.
This is graphically depicted as follows:
The basic idea dates back to the mid-90s. If you are further interested in how this concept was invented, I recommend this article by Martin Fowler.
The specific implementation for the Match Game app is in
30_MVVM-App/MatchGame/MatchGame.xcodeproj. The first notable
difference is that the code in the view controller has shrunk
significantly, down to only 104 lines of code. The MainViewModel
– the new class which now handles the main screen – has
184 lines of code. In addition, we need protocols to let the view
models “talk” to the view controllers. So, all in all, the code has
become more complex.
Matching the View Model State With the Views
The view model now contains the business logic and handles both the game state and the UI state. It does NOT handle the UI itself, but there are properties in the view model that directly correspond to elements in the app UI. This is shown in the next figure.
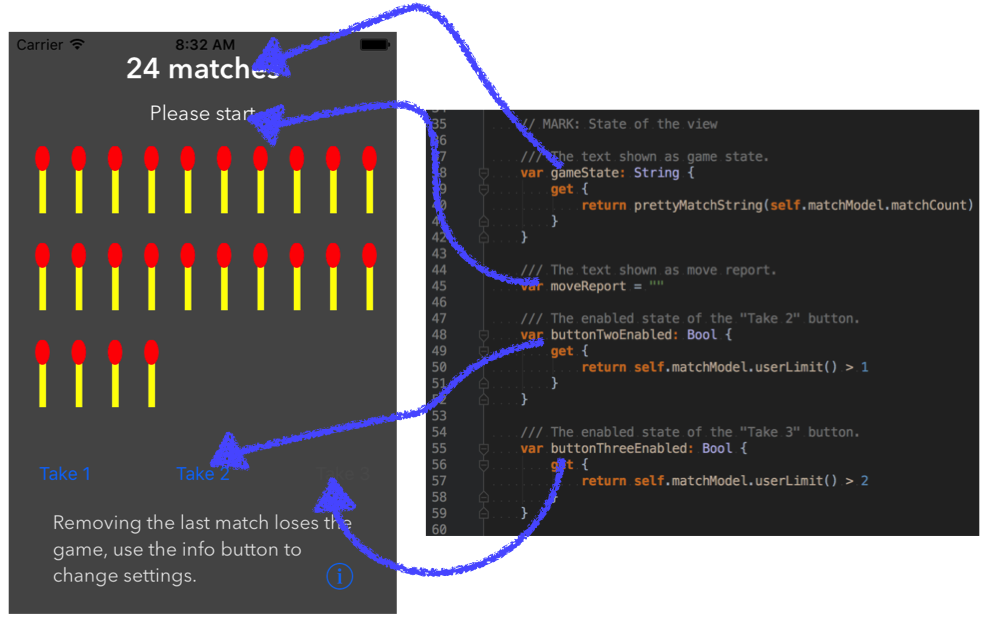
In this manner, separation of concerns is handled in MVVM: The view model decides WHAT shall be shown, the view controller and the storyboard knows HOW to present it to the user.
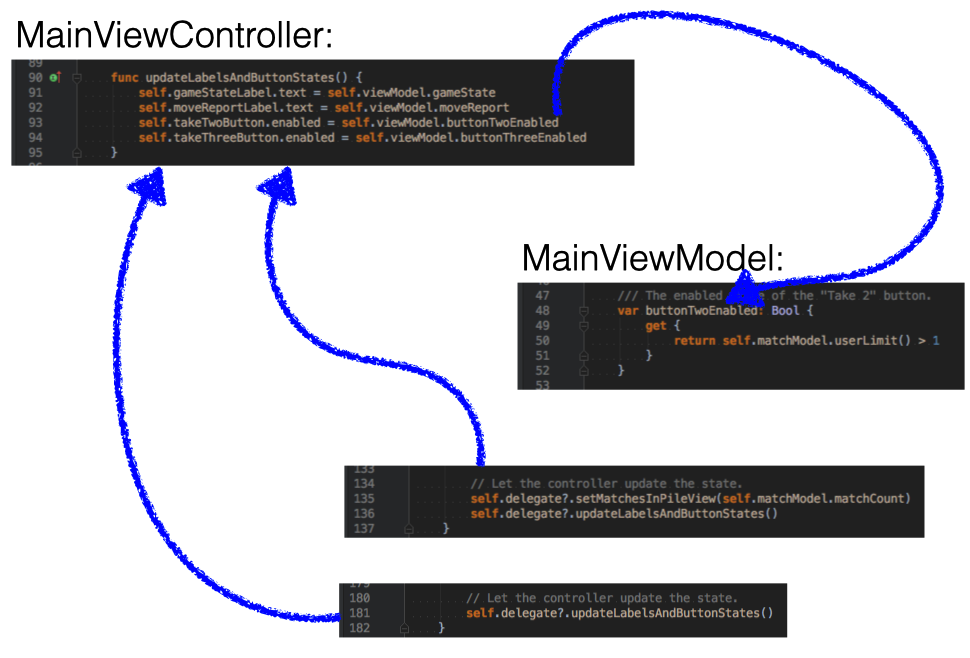
Note, that it is still necessary to regularly call an update method in the view model upon state changes. So far, we did not introduce an automated way to automatically update the UI whenever a property changes.
In the next post of this series, I’ll introduce a way to simplify this task.
The Challenge: Handling Screen Transitions
The most difficult part is handling the “Info” button which takes the user from the main to the settings screen. This workflow is REALLY complex now:
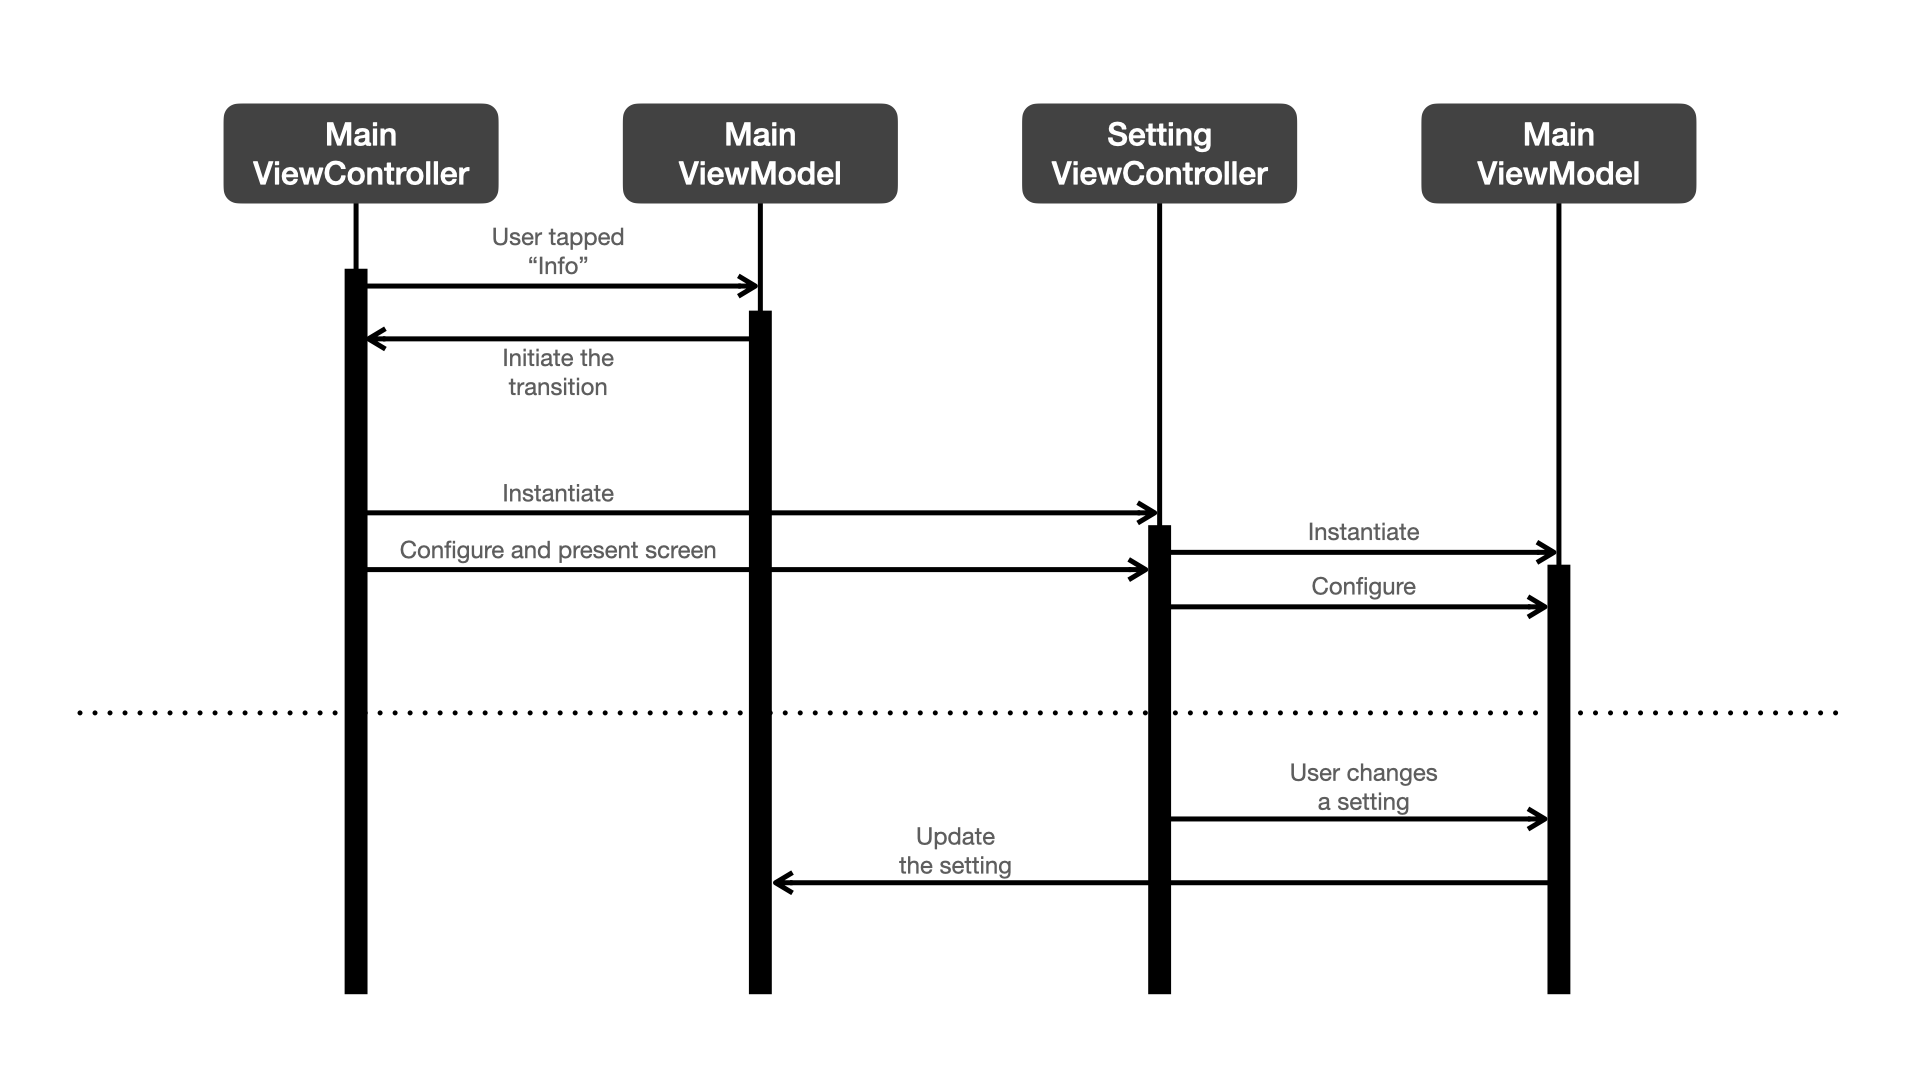
Keep in mind, that the decision of whether a transition shall take place is handled by the view model, not the view controller. For this we need two additional calls:
- The main view controller gets informed when the user taps the button using iOS’s target-action mechanism.
- The main view model then gets informed using the delegate pattern.
- The main view model decides to transition the screen, invoking the corresponding method on the main view controller.
- Changes on the settings screen are received by the settings view controller through iOS’s target-action mechanism. Then the view model gets informed which in turn sends those updates to the main view model.
This is a genuine and proper implementation of the MVVM pattern. The obvious downside is that it has become considerably more complex than in the MVC pattern.
A similar handling also applies to the dialog at the end of a game:
the main view model MainViewModel knows the current game state and
once the last match is taken triggers the presentation of the dialog
by calling the presentDialog method on its delegate (the
MainViewController). The main view controller neither knows the game
state nor what the dialog is about, it just offers a means to present
a dialog.
The Big Win: Testing
Now, there is one big win we gain with the new approach: For testing the business logic we can now entirely rely on a unit test!
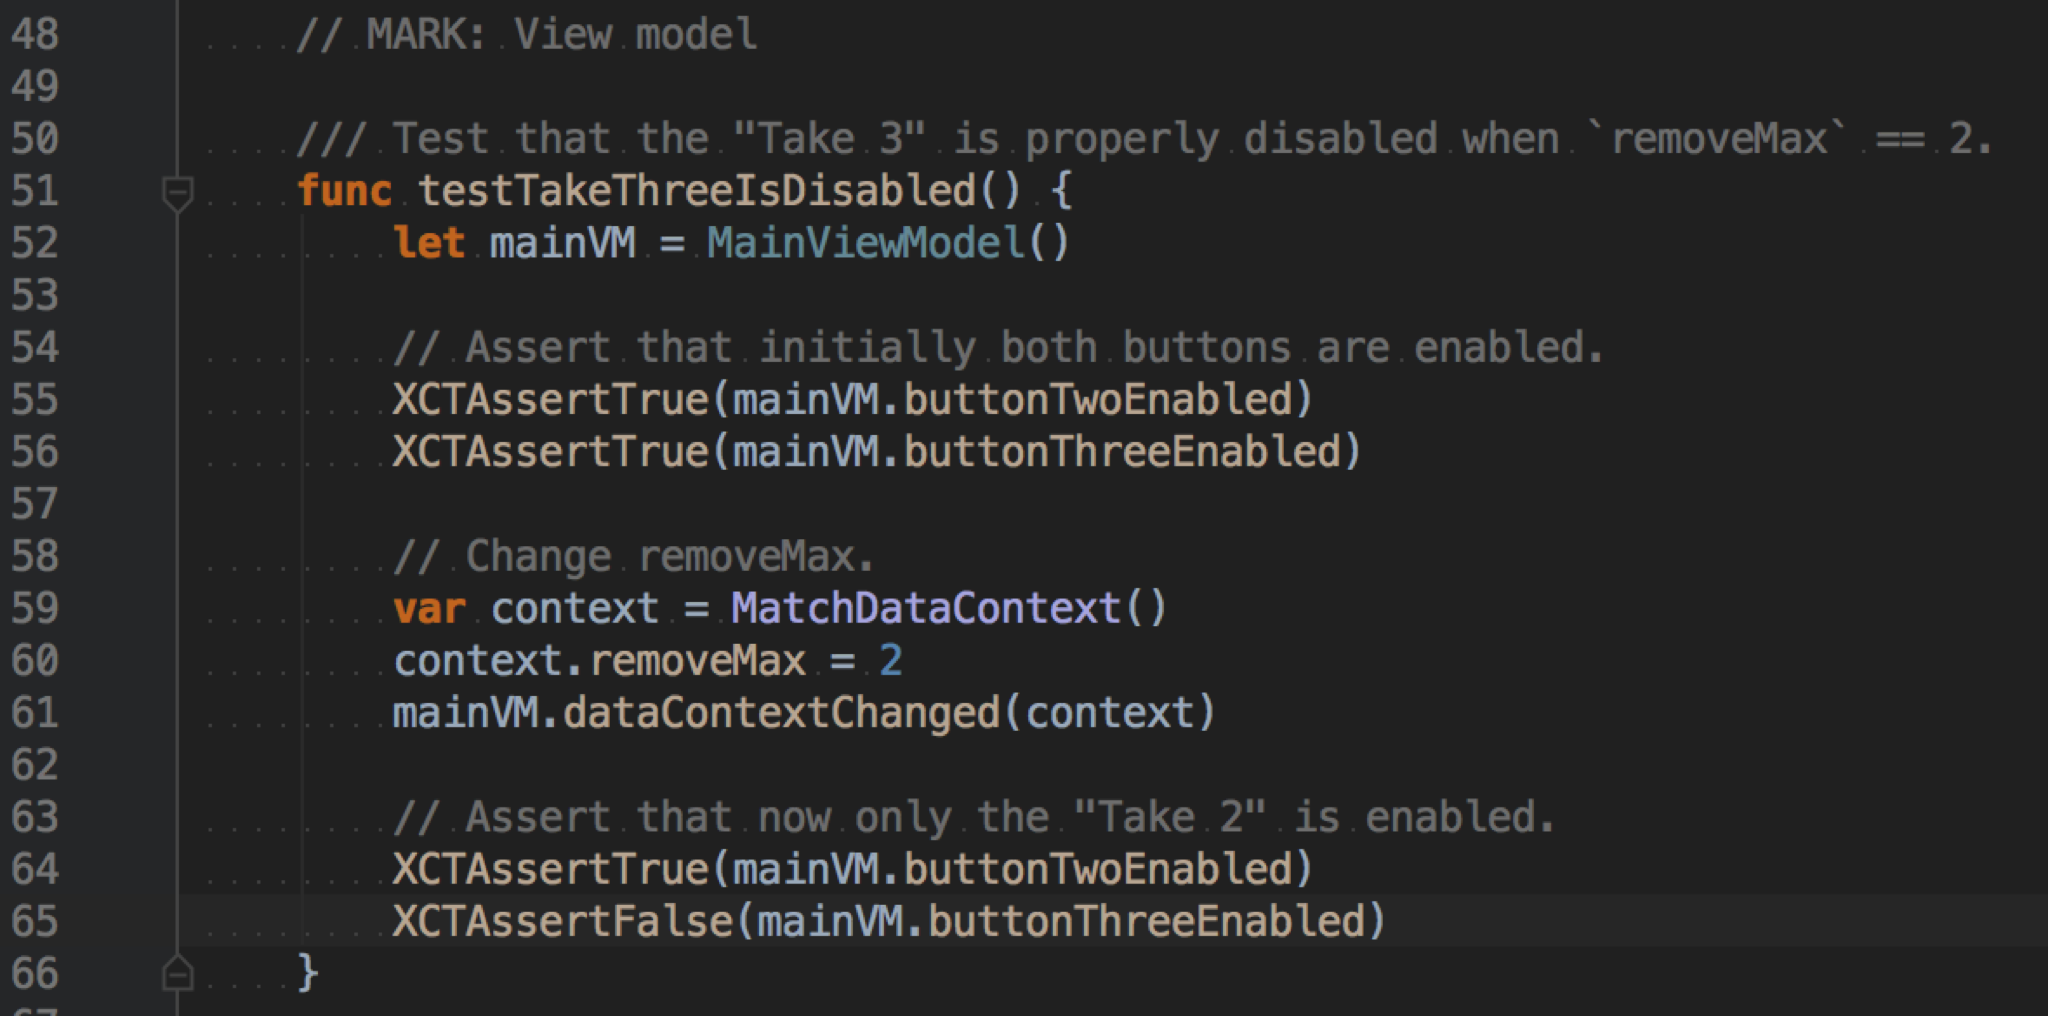
This unit test covers the entire workflow of the UI test in the MVC
app. As a unit test, however, it runs significantly faster and is
stable. To ensure that the correct methods on the main view controller
are invoked, it uses a helper class called MainTakeActionMock which
implements the delegate and makes sure that all methods are correctly
invoked.
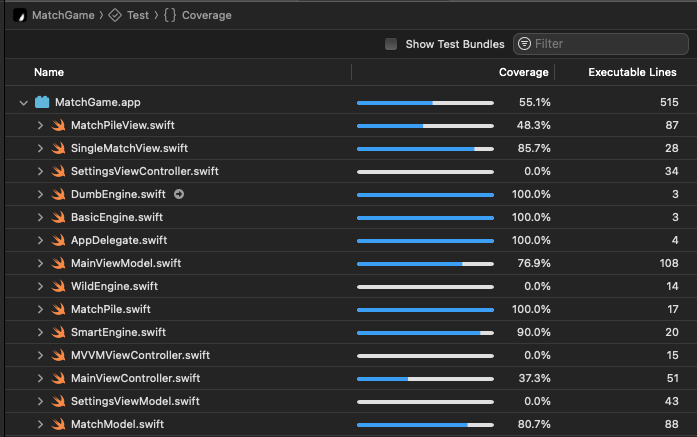
When comparing the code coverage for the unit test, we find that the
coverage is even higher than for the UI test. The UI test covered less
than 28% of the MainViewController which is responsible for the app
workflow. The unit test covers almost 77% of the MainViewModel which
has that responsibility now. Thus, the MVVM pattern has significantly
simplified and sped up testing, making the business logic much more
robust!
The disadvantage of this approach is that the coupling of the view model and the corresponding view controller must be tested separately. A UI test might still be needed to guarantee that a modification did not break any link.
However, experience shows that this is not the primary cause of problems in most cases. The UI may change, but the dependency is explicit through the usage of callbacks and properties. Most breaking changes are usually applied in the view models and the unit tests are the primary way to make them visible before bugs are shipped to the end user.
When Should We Use What?
Do we better stay with MVC or go with MVVM?
Let me quote John Gossman:
“For simple UI, M-V-VM can be overkill. In bigger cases, it can be hard to design the ViewModel up front in order to get the right amount of generality.”
The MVVM pattern is not a panacea for all architecture challenges in an iOS app. The cost is more complexity in the architecture, as we introduce additional classes and protocols. For simple tasks it feels like overkill. However, it helps when the UI gets more complex and involved.
These are use cases where MVC is the better choice:
- The app only has a simple, linear workflow. E.g. when we build an Apple Watch app.
- The app only has limited complexity (like a web viewer).
- UI and/or manual tests are completely sufficient.
However, even for the rather simple Match Game app, pure MVC already becomes quite tedious. For a huge app with hundreds of thousands of lines of code, it needs more structure. This is precisely what MVVM can provide.
In the next part of the series I delve into FRP (Functional Reactive Programming), an improvement that works naturally with MVVM, which can resolve some of the difficulties that we are currently facing when using MVVM alone.